What is it?
The Neuron Inventor Kit is a new range of programmable electronic blocks for students from the makers of the mBot range of robots. The packaging is tough and thoughtfully designed, with the cardboard box having magnetic catches to make it easy for students to open and close it. The two plastic trays show where items are meant to go which is important for ensuring that things are later put away correctly.The backs of the blocks are magnetic, so you can attach them to the whiteboard etc to better show your students how to connect blocks and form circuits. The Neuron Boards also have metals back to attach blocks to. They are also LEGO compatible.


The blocks are nicely made, and they feel and look very durable. They snap together easily using magnetic 'pogo pins'. These are effective connectors as they don't easily fall apart while also being very easy to separate afterwards. The sides of the blocks are colour coded with the Bluetooth and Power blocks being green signifying energy or communications blocks. Input blocks are orange –these included the Funny Touch and Gyro blocks. Output blocks are blue and include the LED panel (containing 64 RGB LEDs), the Buzzer, the Dual Servo Driver and Servo. The included manual is clearly set out and quite useful.
The cardboard case materials allow you to quickly construct some of the projects –full instructions were on the iOS app.
Software options
There's a Makeblock Neuron app for iOS and Android which you'll need for programming or else you can use the Scratch-based mBlock software on a PC or Mac. I tried the recommended mBlock (version 3.4.11) which is the download from the site but found it couldn’t “talk” to the Neuron set. I contacted CD-Soft and they gave a link. Version 4 supports Neuron really well –you can even connect it with a USB so don’t need a Bluetooth PC. Version 5 is in Alpha release 9 (April 3, 2018) but the earlier release I tried before Easter only supported another product called Codey. I have run out of time to try the current version.
Using the kit
Neuron blocks have two modes: Online Mode and Offline Mode. When a chain of Neuron blocks is not connected to an iPad or a PC, it stays in the Offline Mode. If you connect the Power block to the Gyro Sensor block and then the LED block you can get the lights to light up by moving the group around or tapping the Gyro Sensor block. Similarly, if you have the LED block replaced with a Servo Driver and Servo, the Servo will move back and forward responding to motion or tapping.
Online Mode
Now if you add the Bluetooth block you can connect it to the iPad or PC and program the blocks to respond to instructions.
The Apps
Neuron App


Along the bottom of the screen are various tools (nodes)
Basic which includes Compare, Number, Interval as well as NOT, AND, OR and a counter
Controls which include Button, Switch, Slider, Indicator, Label, Curve, Number and Text Box
Time has Delay, Hold, Average, Today, Now, Pulse and Sequence
Advanced contains icons for Random, Scale, Filter, Function, ComputePlus, ComparePlus and Valve
A lot of these nodes are for a wider range of blocks – the full set of more than 30 modules can be seen here.
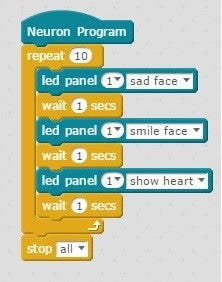
Programming on the PC with mBlock version 4 software
My example has the Bluetooth, Power and LED panel blocks connected to the PC via USB plugged into the Bluetooth block. When clicked it shows a sad face, waits for 1second and changes to a happy face, waits for 1second and changes to a heart. The program repeats 10 times. The programming was simple and easy to debug (I originally forgot the wait commands and the whole thing was over before I knew it.)

My Favourite Block
The Funny Touch which has 4 leads with coloured alligator clips and another lead as a Ground. Holding the ground clip and touching any of the other four completes a circuit. It is fun to work with in the Offline mode. I see a possibility of making a race track with the Ground lead attached to a centre track of foil or copper tape and having two Funny leads attached to side strips of foil at the top (the Start line) and two attached to strips again on the side of the track at the bottom (the Finish line). In the Online mode these could possibly be programmed so that when a student-made car with suitable connectors (to touch both the Ground strip and side strips) is placed on it the time of its travel down the track can be measured. Once again I have run out of time to test my ideas.

Offline Mode
In offline mode I connected the Power block, the Funny Touch and the buzzer. When I touched any of the coloured plugs while holding the Ground plug a sound would play. I connected some fruits to the coloured plugs (an apple, banana, orange and lemon) and these became my musical instruments. By holding the Ground plug and touching each fruit I completed the circuit and made a different tone for each fruit. I experimented and tried to play simple tunes. My granddaughters thought it was wonderful.Still in Offline mode Using the guide on the iPad we were able to use the cardboard shapes and added hardware (Funny Touch connected to the Power block connected to the LED display) to make the light palette. It was a more sophisticated version of what we had been investigating and changed the coloured LED display depending on which plug was touched.


Summary
This package would fit well into the upper primary school where electrical circuits are part of the curriculum outcomes in the Physical Science strand. The offline mode allows easy connections making it virtually foolproof to complete a working circuit. This makes it a useful tool for introducing circuits. The real fun comes when it is connected to the computer as there is a wider range of things for the blocks to do while running the programs. The two programming options are easy to learn and Bluetooth allows the program to operate things remotely (the Internet of Things -IoT). Having the use of the USB as well means that schools without iPads or Smartphones can use existing non-Bluetooth hardware to program the kits. A great STEM teaching resource.


